

Services
Kubernetes Services enable communication between various components within and outside of the application. Kubernetes Services helps us connect applications with other applications or users.
For example, our application has groups of PODs running various sections, such as a group for serving front-end load to users, another group running back-end processes, and a third group connecting to an external data source. It is Services that enable connectivity between these groups of PODs. Services enable the front-end application to be made available to users, help communication between back-end and front-end PODs, and help in establishing connectivity to an external data source. Thus services enable loose coupling between microservices in our application.
Why do we need services?
Problem 1: If one pod goes down replica set creates a new pod but the IP address will change, whenever the new pod comes up it comes up with a new IP Address. so how does the user or customer know about this new IP address?
Problem 2: If your application requires multiple replicas of a pod to serve multi concurrent users, each replica of a pod has a unique IP address but customers or users would need one common IP address or DNS. Just like we all access google.com(DNS) or 8.8.8.8(IP Address) to access Google.
How is this implemented in Kubernetes?
To solve this issue, Kubernetes uses an object called a “service”.
The service provides a stable IP address (virtual IP address) for clients that want to connect to Pods. It “hides” the actual IP addresses of the pods behind it and forwards the incoming connections to them.
Solution
Service Discovery
Service comes up with a process which is called labels and selectors. So whenever a pod is created/getting created DevOps engineer will apply a label. This label will be common to all pods
The service doesn't bother about IP address it will watch for the pods with specific Labels.
Why label remain the same?
The replica set controller will deploy a new pod with the same yaml that it got.
So if the service is keeping track of pods using labels instead of IP addresses & the label is always the same the problem is solved.
This is a service Discovery mechanism.
Expose to the external world.
whenever we create deployment the pod is created. This pod came up with a new IP address.
Whoever has access to the Kubernetes cluster? It can be minikube, KOPS, or EKS They can log in to the Kubernetes cluster & they can hit the application.
This is not a real-world scenario, we can't ask our customers to SSH my machine, log in to Kubernetes & access my application cause, for example, my users in Europe or Australia I can't tell they don't have access to my application directly cause they are not in my network. Firstly they have to use VPN and then come to my Network.
So, what service do additionally?
A Service can expose our application can allow the application to access outside the Kubernetes cluster.
Services Types
Cluster IP Mode
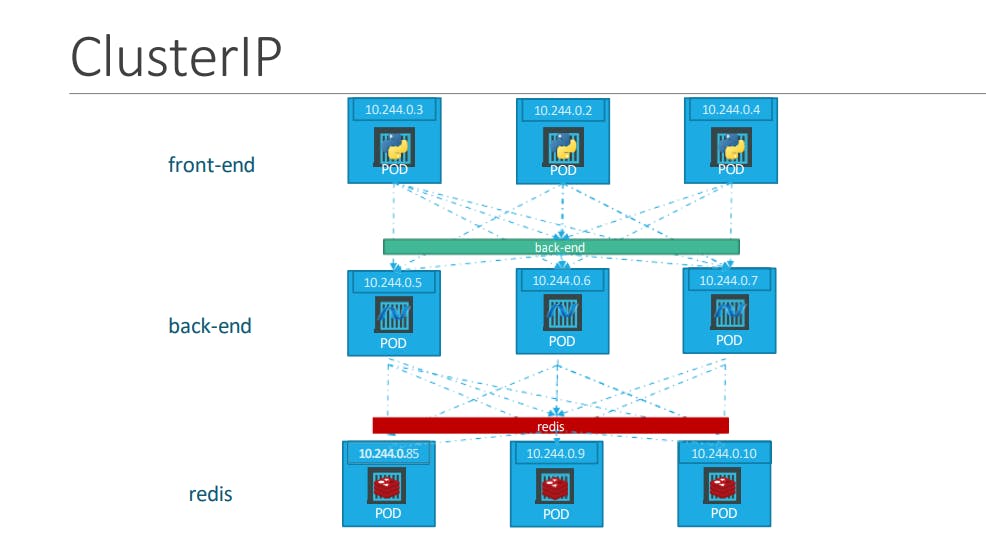
Your pods or your service will get a cluster IP so if you try to access your service so you will be only able to access the service using the cluster IP which is only available or accessible within the Kubernetes cluster.
Advantage: It provide service discovery.
Disadvantage: Application only accessible inside Kubernetes cluster.
Node port
When a service is created with a NodePort type, The kube-proxy updates the IPTables with the Node IP address and port that is chosen in the service configuration to access the pods.
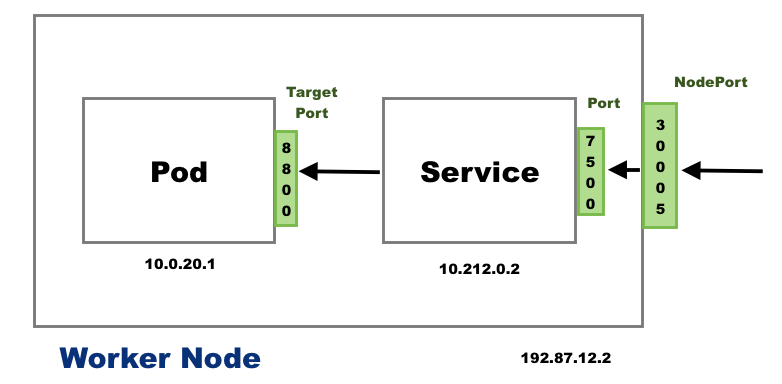
It will allow your application to be accessed inside your organization.
Anybody within our network technically might not have access to Kubernetes clusters but they have access to the worker Node IP address.
Whoever has access to the Node IP address only they can access the application if the service is created in Note-Port mode.
Load Balancer
If you create a Service as type LoadBalancer, the cloud control manager creates an external load balancer IP using the underlying cloud provider logic in the C-CM. Users can access services using the external IP
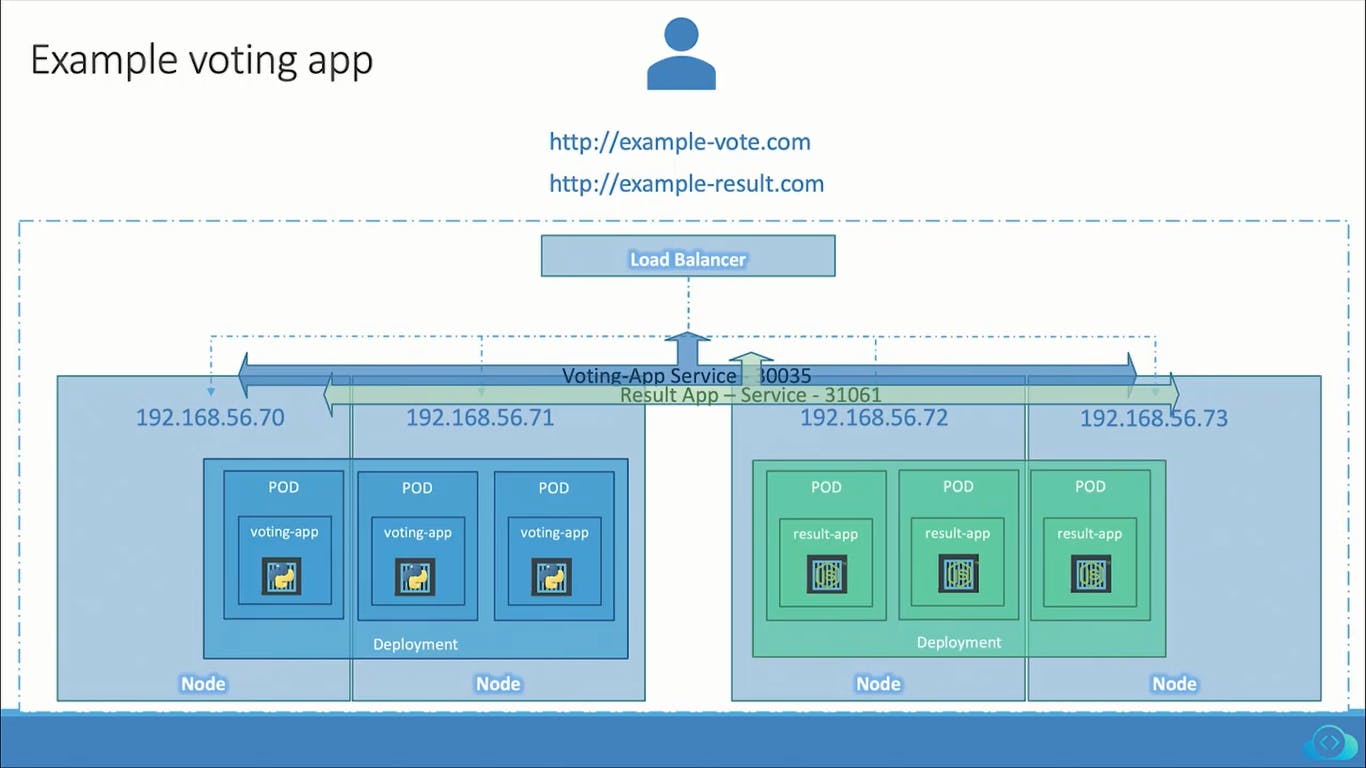
EKS---service--->Load Balancer----get---->Elastic Load Balancer IP address for my service. This is a public IP address so anyone in the world can access it.
What Is Kubernetes Ingress?
Ingress is a powerful Kubernetes resource that allows you to expose HTTP and HTTPS routes from outside the cluster to services within the cluster. We'll dive into what Ingress is, how it works, and how to use it effectively.
What is Ingress?
Ingress is a Kubernetes resource that provides a way to manage external access to services in a Kubernetes cluster. In other words, Ingress allows you to route traffic from outside the cluster to services running inside the cluster. Ingress is an alternative to creating a LoadBalancer service or a NodePort service, which can be less flexible and more difficult to manage.
At a high level, Ingress consists of two parts: an Ingress controller and Ingress rules. The Ingress controller is responsible for monitoring changes to the Ingress resources and updating the configuration of the underlying load balancer. Ingress rules define how traffic should be routed to services based on the URL path and host.
How Ingress Works
To understand how Ingress works, let's take a closer look at the two main components: the Ingress controller and Ingress rules.
Ingress Controller
The Ingress controller is responsible for managing the underlying load balancer and routing traffic to the appropriate service based on the Ingress rules. The Ingress controller is typically a software component that runs inside the Kubernetes cluster and communicates with the Kubernetes API server to watch for changes to the Ingress resources.
When a new Ingress resource is created, the Ingress controller reads the Ingress rules and creates or updates the configuration of the underlying load balancer. The Ingress controller can work with a variety of load balancers, including Nginx, Traefik, and HAProxy.
Ingress Rules
Ingress rules define how traffic should be routed to services based on the URL path and host. Ingress rules consist of a set of rules that map incoming requests to services based on the request's host and path.
Here's an example of an Ingress rule that routes traffic based on the host:
apiVersion: networking.k8s.io/v1
kind: Ingress
metadata:
  name: example-ingress
spec:
  rules:
  - host: example.com
    http:
      paths:
      - path: /
        pathType: Prefix
        backend:
          service:
            name: example-service
            port:
              name: http
This Ingress rule specifies that requests to example.com should be routed to the example-service service, which is listening on port 80.
In addition to host-based routing, Ingress rules can also route based on the URL path. Here's an example of an Ingress rule that routes traffic based on the URL path:
apiVersion: networking.k8s.io/v1
kind: Ingress
metadata:
  name: example-ingress
spec:
  rules:
  - host: example.com
    http:
      paths:
      - path: /app1
        pathType: Prefix
        backend:
          service:
            name: app1-service
            port:
              name: http
      - path: /app2
        pathType: Prefix
        backend:
          service:
            name: app2-service
            port:
              name: http
This Ingress rule specifies that requests to example.com/app1 should be routed to the app1-service service, and requests to example.com/app2 should be routed to the app2-service service.
How to Use Ingress
To use Ingress, you'll first need to set up an Ingress controller. There are several Ingress controllers available, including Nginx, Traefik, and HAProxy. You can choose the Ingress controller that best fits your needs based on features, performance, and ease of use.
Once you've set up your Ingress controller, you can create Ingress rules that define how traffic should be routed to your services. Ingress rules are defined using YAML files and consist of a set of rules that map incoming requests to services based on the request's host and path.
Here's an example of an Ingress rule that routes traffic based on the host:
apiVersion: networking.k8s.io/v1
kind: Ingress
metadata:
  name: example-ingress
spec:
  rules:
  - host: example.com
    http:
      paths:
      - path: /
        pathType: Prefix
        backend:
          service:
            name: example-service
            port:
              name: http
In this example, requests to example.com are routed to the example-service service.
You can also route traffic based on the URL path using Ingress rules. Here's an example of an Ingress rule that routes traffic based on the URL path:
apiVersion: networking.k8s.io/v1
kind: Ingress
metadata:
  name: example-ingress
spec:
  rules:
  - host: example.com
    http:
      paths:
      - path: /app1
        pathType: Prefix
        backend:
          service:
            name: app1-service
            port:
              name: http
      - path: /app2
        pathType: Prefix
        backend:
          service:
            name: app2-service
            port:
              name: http
In this example, requests to example.com/app1 are routed to the `app1'
Kubernetes DNS Service
The Domain Name System (DNS) is a system for associating various types of information – such as IP addresses – with easy-to-remember names. By default most Kubernetes clusters automatically configure an internal DNS service to provide a lightweight mechanism for service discovery. Built-in service discovery makes it easier for applications to find and communicate with each other on Kubernetes clusters, even when pods and services are being created, deleted, and shifted between nodes.
What Kubernetes DNS Service Provide
Before Kubernetes version 1.11, the Kubernetes DNS service was based on kube-dns. Version 1.11 introduced CoreDNS to address some security and stability concerns with kube-dns.
Regardless of the software handling the actual DNS records, both implementations work in a similar manner:
A service named
kube-dnsand one or more pods are created.The
kube-dnsservice listens for service and endpoint events from the Kubernetes API and updates its DNS records as needed. These events are triggered when you create, update or delete Kubernetes services and their associated pods.kubelet sets each new pod’s
/etc/resolv.confnameserveroption to the cluster IP of thekube-dnsservice, with appropriatesearchoptions to allow for shorter hostnames to be used:resolv.conf
  nameserver 10.32.0.10
  search namespace.svc.cluster.local svc.cluster.local cluster.local
  options ndots:5
Applications running in containers can then resolve hostnames such as
example-service.namespaceinto the correct cluster IP addresses.
Example Kubernetes DNS Records
The full DNS A record of a Kubernetes service will look like the following example:
service.namespace.svc.cluster.local
A pod would have a record in this format, reflecting the actual IP address of the pod:
10.32.0.125.namespace.pod.cluster.local
Additionally, SRV records are created for a Kubernetes service’s named ports:
_port-name._protocol.service.namespace.svc.cluster.local
The result of all this is a built-in, DNS-based service discovery mechanism, where your application or microservice can target a simple and consistent hostname to access other services or pods on the cluster.
Search Domains and Resolving Shorter Hostnames
Because of the search domain suffixes listed in the resolv.conf file, you often won’t need to use the full hostname to contact another service. If you’re addressing a service in the same namespace, you can use just the service name to contact it:
other-service
If the service is in a different namespace, add it to the query:
other-service.other-namespace
If you’re targeting a pod, you’ll need to use at least the following:
pod-ip.other-namespace.pod
As we saw in the default resolv.conf file, only .svc suffixes are automatically completed, so make sure you specify everything up to .pod.
Now that we know the practical uses of the Kubernetes DNS service, let’s run through some details on the two different implementations.
Kubernetes DNS Implementation Details
As noted in the previous section, Kubernetes version 1.11 introduced new software to handle the kube-dns service. The motivation for the change was to increase the performance and security of the service. Let’s take a look at the original kube-dns implementation first.
kube-dns
The kube-dns service prior to Kubernetes 1.11 is made up of three containers running in a kube-dns pod in the kube-system namespace. The three containers are:
kube-dns: a container that runs SkyDNS, which performs DNS query resolution
dnsmasq: a popular lightweight DNS resolver and cache that caches the responses from SkyDNS
sidecar: a sidecar container that handles metrics reporting and responds to health checks for the service
Security vulnerabilities in Dnsmasq, and scaling performance issues with SkyDNS led to the creation of a replacement system, CoreDNS.
CoreDNS
As of Kubernetes 1.11 a new Kubernetes DNS service, CoreDNS has been promoted to General Availability. This means that it’s ready for production use and will be the default cluster DNS service for many installation tools and managed Kubernetes providers.
CoreDNS is a single process, written in Go, that covers all of the functionality of the previous system. A single container resolves and caches DNS queries, responds to health checks, and provides metrics.
In addition to addressing performance- and security-related issues, CoreDNS fixes some other minor bugs and adds some new features:
Some issues with incompatibilities between using stubDomains and external services have been fixed
CoreDNS can enhance DNS-based round-robin load balancing by randomizing the order in which it returns certain records
A feature called
autopathcan improve DNS response times when resolving external hostnames, by being smarter about iterating through each of the search domain suffixes listed inresolv.confWith kube-dns
10.32.0.125.namespace.pod.cluster.localwould always resolve to10.32.0.125, even if the pod doesn’t actually exist. CoreDNS has a “pods verified” mode that will only resolve successfully if a pod exists with the right IP and in the right namespace.
For more information on CoreDNS and how it differs from kube-dns, you can read the Kubernetes CoreDNS GA announcement.
Additional Configuration Options
Kubernetes operators often want to customize how their pods and containers resolve certain custom domains, or need to adjust the upstream nameservers or search domain suffixes configured in resolv.conf. You can do this with the dnsConfig option of your pod’s spec:
example_pod.yaml
apiVersion: v1
kind: Pod
metadata:
  namespace: example
  name: custom-dns
spec:
  containers:
    - name: example
      image: nginx
  dnsPolicy: "None"
  dnsConfig:
    nameservers:
      - 203.0.113.44
    searches:
      - custom.dns.local
Updating this config will rewrite a pod’s resolv.conf to enable the changes. The configuration maps directly to the standard resolv.conf options, so the above config would create a file with nameserver 203.0.113.44 and search custom.dns.local lines.
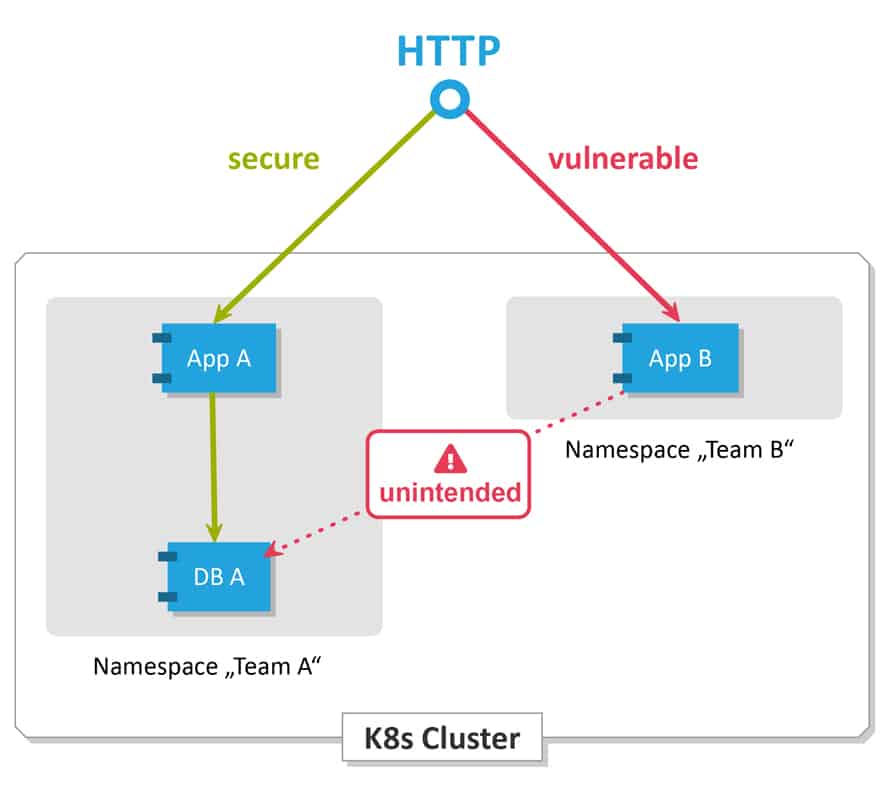
Network Policies
This is Kubernetes assets that control the traffic between pods. Kubernetes network policy lets developers secure access to and from their applications. This is how we can restrict a user for access.
Any request that is successfully authenticated (including an anonymous request) is then authorized. The default authorization mode is always allowed, which allows all requests. In Kubernetes, you must be authenticated (logged in) before your request can be authorized (granted permission to access).
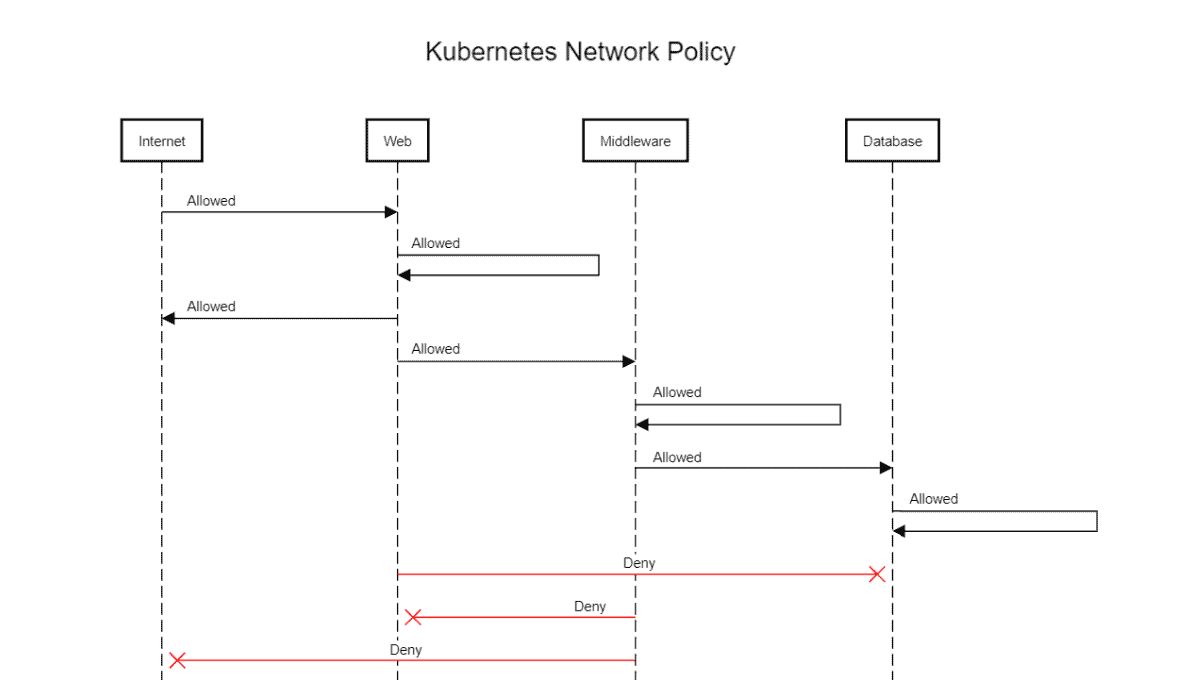
How Does Network Policy Work?
There are unlimited situations where you need to permit or deny traffic from specific or different sources. This is utilized in Kubernetes to indicate how gatherings of pods are permitted to speak with one another and with outside endpoints.
Rules:
Traffic is allowed unless there is a Kubernetes network policy selecting a pod.
Communication is denied if policies are selecting the pod but none of them have any rules allowing it.
Traffic is allowed if there is at least one policy that allows it.
Network Policy In Pods
All Pods in Kubernetes communicate with each other which are present in the cluster. By default all Pods are non-isolated however Pods become isolated by having a Kubernetes Network Policy in Kubernetes. Once we have it in a namespace choosing a specific pod, that will restrict all the incoming and outing traffic of the pods.
Pod traffic is not restricted if If there are no network policies that exist.
Network Policy Specification
PodSelector – Each of these includes a pod selector that selects the grouping of pods to which the policy applies. This selects particular Pods in the same namespace as the Kubernetes Network Policy which should be allowed as ingress sources or egress destinations.
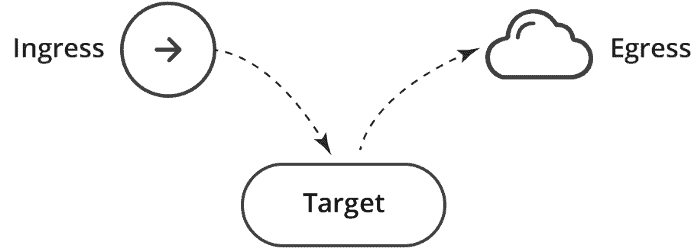
Policy Types – indicates which sorts of arrangements are remembered for this approach, Ingress, or Egress.
Ingress – Each Network Policies may include a list of allowed ingress rules. This includes inbound traffic whitelist rules.
Egress – Each Network Policy may include a list of allowed egress rules. This includes outbound traffic whitelist rules.
Composing Kubernetes Network Policy
Like different Kubernetes assets, this can be defined by utilizing a language called YAML. For this, you will require a basic knowledge of YAML. Yaml depends on indentation.
When you’ve composed the YAML, use kubectl to make the strategy:
kubertl create -f policy.yaml
The Kubernetes Network Policy resource uses labels to determine which pods it will manage. Kubernetes objects, like pods and namespaces, can have user-defined labels attached to them.
Why Network Policy?
This can be thought of as the Kubernetes likeness a firewall.
They are used in Kubernetes to indicate how gatherings of pods are allowed to speak with one another and with external network endpoints.
For restricting the traffic between the pods we need network policies in Kubernetes, by default all traffic is allowed.
CNI Plugins
Container Network Interface, a Cloud Native Computing Foundation venture, comprises of detail and libraries for writing plugins to configure network interfaces in Linux containers
Kubernetes utilizes CNI as an interface between network suppliers and Kubernetes pods networking. Below are some examples:
Calico
It enables networking and network policies in the Kubernetes cluster over the cloud.
![]()
Weave
Weave enables networking and network policy in the Kubernetes cluster over the cloud. Also, it supports encoding traffic between peers.
![]()
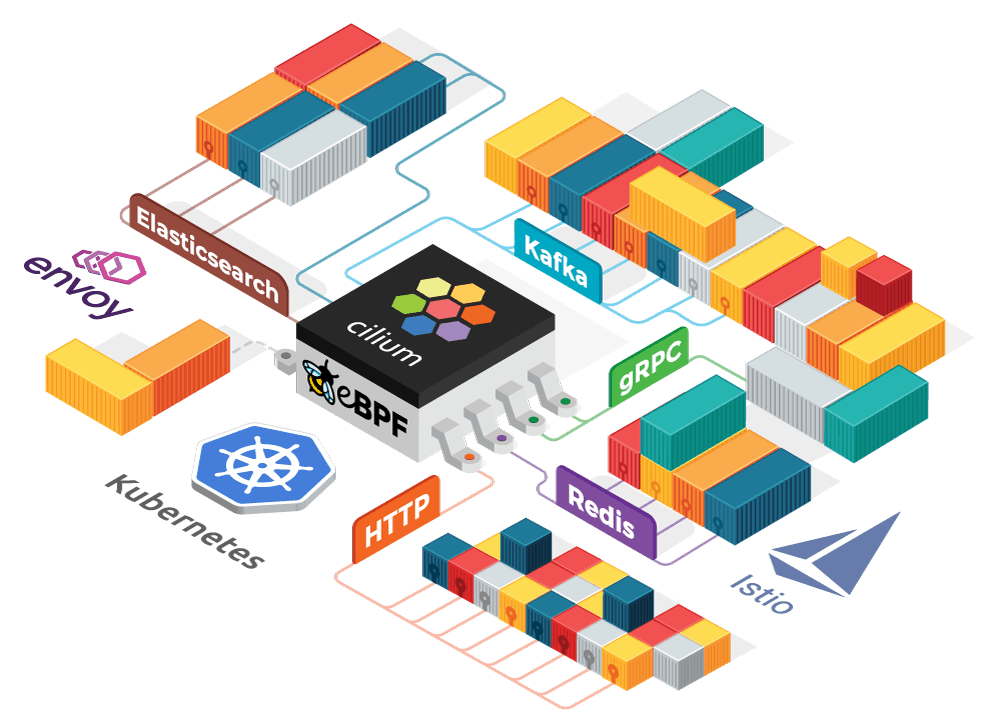
Cilium
Cluster Mesh creates a single zone of connectivity for load-balancing, observability, and security between nodes across multiple clusters, enabling simple, high-performance cross-cluster connectivity.
Connect me on
LinkedIn: https://www.linkedin.com/in/aditya-tak/
Hashnod: https://hashnode.com/@AdityaDevOps
#Kubernetes #Devops #Kubeweek #kubeweekchallenge
Resources:
https://www.youtube.com/watch?v=xY6Ic7Igzck&list=PLdpzxOOAlwvIKMhk8WhzN1pYoJ1YU8Csa&index=42
https://kodekloud.com/blog/kubernetes-ingress/
https://www.kloia.com/blog/why-do-we-use-cni-plugins-on-kubernetes
https://k21academy.com/docker-kubernetes/network-policies-in-kubernetes/